P38 BECM communications
When making my p38 camper I needed to make a new wiring loom but still wanted to keep the look of the P38 internally as I feel it is a very tidy interior, I also wanted to remove the BECM and make a small neater one that did the bits I just needed.
The BECM talks to all the other systems (ABS,ENGINE,HVAC) via simple wires going hi and lo to indicate errors or status,
The outstations in the doors, display and the switch panel use a form of serial comms to talk to each other.
I only reverse-engineered the display but the comms system is the same on the others it will take someone else to sniff the codes using a simple cheap Arduino.
There is a working arduino sketch at the end of the post.
you just need three wires to the display, +12v and ground to make it work with any of the components., if you only want to listen then you can just sniff the data wire, to know which is sending the data is a little harder to do, because you cant detect which end pulled the line low.
The system runs on three wires,
- Clock wire
- Data Direction
- Data wire
- ground is always needed 🙂
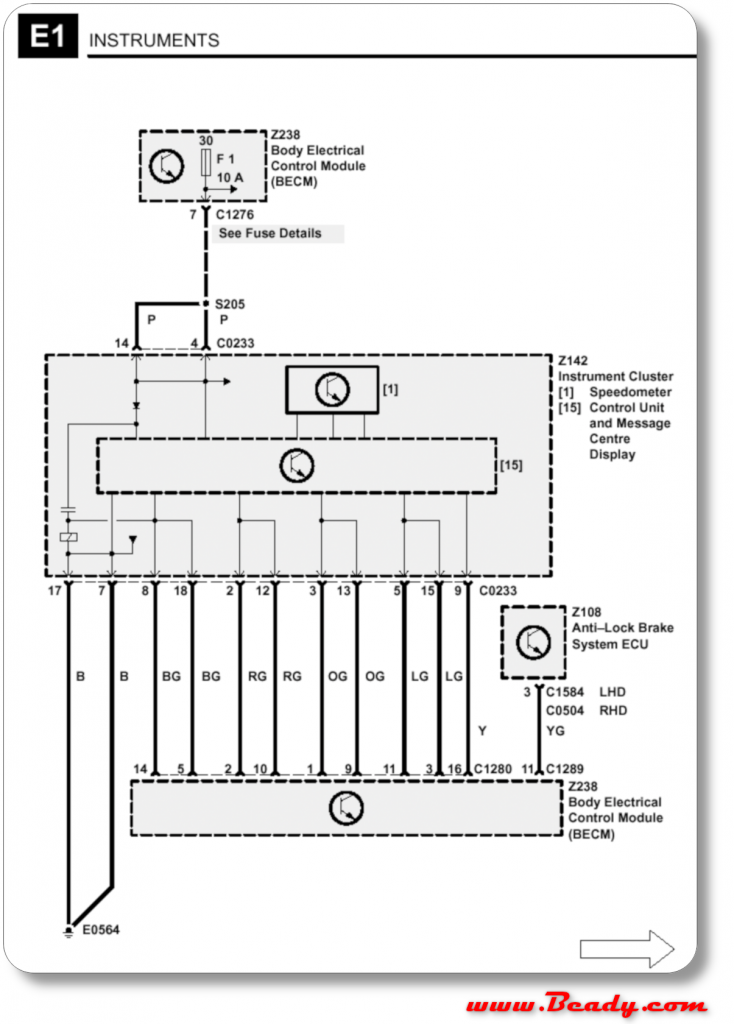
The data wires to the display are easy to get to on the BECM they are on the plug just below the fusebox and can easy be identified because of the dual coloured wires. push a paperclip into the data wire and connect that to the a input pin on the arduino with a 1k resistor in series then connect a earth from the car to your arduino and then make a sketch to relay, use 4800 8N1 bps comms on the BECM wire to the serial monitor on the computer. then press things or make things happen on the car and see what gets sent to/from the BECM. you should see the mileage being sent from the display to the BECM it is easy to work it out.
Bytes : A6 13 83 73 45
A6 is the code to says its mileage then the mileage is in plain text here the mileage is 138373 (45 is the checksum)
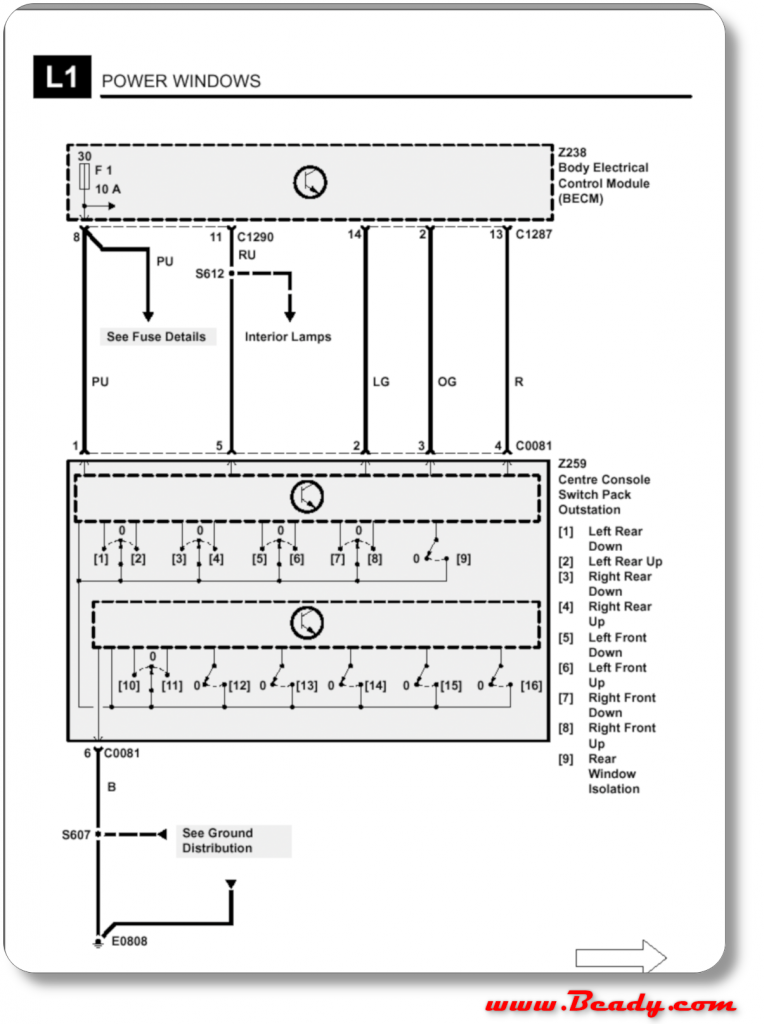
Here is how the connections are wired into the switch panel for the windows

three wires OG,LG and R (black = GND)
on the display the signals wires are doubled up for reliabilty .

basically there is a red a green and a orange wire 2 & 12 ,3 & 13 , 5 & 15
orange is Data direction
red is clock signal
green is the actual data
the clock wire runs at 4.8 khz
the data dir wire is pulled low when sending data, you must wait 5ms before writing to the data line after pulling this low
and the data is 4800 8N1 just like any rs232
So what does this data ?
The data is in 10 byte blocks
which consist of two 5 byte sections
byte 0 : ID
byte 1 : data
byte 2 :data
byte 3 :data
byte 4 : Checksum byte : bytes 0,1,2,3 all XORed together
The display sleeps if it doesn’t get a valid data stream, so if you have power and nothing is on the screen then your data stream is wrong somehow.
to keep the screen awake when you dont need to send any data then you must send AA AA AA AA cs 00 which is the keep alive signal
Byte 1 is the control/action code
- 0xA5 : is the lights on the display
- 0x00 : are messageson the upper line of the LCD, I pressume these vary by Display ROM, you can set the language
- 0x0F : message on the lower line of the LCD
0x
OK, if you now used my Arduino sketch and have the hazard lights on the display going on/off what else can you send to the display?
Here is what I have found that you can send the display, I didn’t decode the data coming from the display because I didn’t need it.
| Byte # | Hex | bit | Function |
| 1 | A5 | {lighting } | |
| 2 | …. …0 | Left indicator | |
| …. ..1. | Main beam indicator | ||
| …. .2.. | Right indicator | ||
| …. 3… | Brake warning light | ||
| …4 …. | Low fuel light | ||
| ..5. …. | Over temp light | ||
| .6.. …. | Traction control light | ||
| 7… …. | Seat belt light | ||
| 3 | …. …0 | BATT light | |
| …. ..1. | Oil light | ||
| …. .2.. | ABS light | ||
| …. 3… | Heater plugs light | ||
| …4 …. | Engine check light | ||
| ..5. …. | Nothing ??? | ||
| .6.. …. | Transfer box warning | ||
| 7… …. | Trailer light | ||
| 4 | …. …0 | ||
| …. ..1. | SRS light? Gauges ON must be set to make gauges work I.e. BYTE 4 must be at least 0x06 for back light to be on and the gauges working. | ||
| …. .2.. | LCD back Light | ||
| …. 3… | Side light indicator | ||
| …4 …. | Air susp up light | ||
| ..5. …. | Nothing ?? | ||
| .6.. …. | Nothing ?? | ||
| 7… …. | Nothing?? | ||
| 5 | CS first 4 bytes XORed together | ||
| Byte # | Hex | bit | function |
| 1 | 00 | {messages} | |
| 2 | 0x_0 | english | |
| 0x_1 | french | ||
| 0x_2 | german | ||
| 0x_3 | |||
| Upper nibble | ?? | ||
| 3 | 0x00 | Same as byte 4 but for lower LCD line | |
| 4 | Message | On upper line of lcd | |
| 0x00 to 0x16 | “FUSE xx failed” | ||
| 17 | Right dip beam | ||
| 18 | Left dip beam | ||
| 19 | RH main beam | ||
| 1A | LH main beam | ||
| 0x33 | “Check oil level” | ||
| 0x34 | “Engine oil overheat” | ||
| 0x35 | “gearbox overheat” | ||
| 0x36 | Transfer overheat | ||
| 0x48 | Ignition key in | ||
| 0x49 | Lights on | ||
| 0x4b | Overspeed | ||
| 0x4e | Fuel guage fault | ||
| 0x4f | Temp guage fault | ||
| 0xA1 | Diagnostic mode | ||
| 0xa3 | Start engine | ||
| 0xA6 | SLOW DOWN | ||
| 0xA8 | ICE alert | ||
| 0xff | Test pattern | ||
| Byte # | Hex | bit | function |
| 1 | 0F | 0x59 messes this up | |
| 2 | Bit 0-3 0-7 | P N R D 2 1in lcd | |
| Bit 3 | LOW or L if PDRN is shown | ||
| Upper nibble | |||
| 1 | SPORT | ||
| 2 | high | ||
| 3 | …. …0 | ||
| …. ..1. | |||
| …. .2.. | |||
| …. 3… | |||
| …4 …. | |||
| ..5. …. | |||
| .6.. …. | |||
| 7… …. | |||
| 4 | …. …0 | ||
| …. ..1. | |||
| …. .2.. | |||
| …. 3… | |||
| …4 …. | |||
| ..5. …. | |||
| .6.. …. | |||
| 7… …. | |||
| 5 | |||
0x55 fuel and temp gauge
3
Warning lights come on automatic but can be tested using A5
0x49 temp warning light comes on
0x97 low fuel light comes on
NOTE
AA AA AA AA cs 00 = 0 keep alive
If not received by dash or another message then the display goes into fail mode.
Warning about temp and fuel and both gauges go to min fuel and max temp
erors and wierd stuff
If the DIR wire is disconnected the dash goes to sleep
0x59 does something weird but never worked out what
0x15 turns stuff off?
A6,, message strategy?
{0x5a,0x9B,0xF5,0x00,0x3B,0xA5,0x00,0x00,0x04,0xA0};
This was making the overall mileage run up
Arduino sketch for P38 BECM comms
Here is a working Arduino sketch , if you know what an Arduino is then you know what to do,
I think I used pull-up resistor to get 12v lines from the 5v , but I am not fully sure of this so check, the signal will be inverted if I did
have fun and please send me updates.
Arduino Sketch to Communicate with a P38 BECM
Please add/correct me on any info here so we can build a good knowledge of this subject
[…] Download Image More @ http://www.beady.com […]
Hi Beady, wow – excellent work on the BeCM data: I have too have a P38 and want to delve deeper into the comm’s side as I have a retirement project in mind which requires the dash display to be modified. I tried to copy your sketch from this page as a starting point, but the far RH side is missing from the longer lines: any chance of re-working the page or emailing it over to me please? Best wishes for you travels – very adventurous!
Hi Zhapod 🙂
I have changed the post and added a link to the sketch to download.
I would like to get the info button working on the left stalk, so I can get a fuel computer working,
bd
Hello looking for range rover 4.0 se p38 ecu pin out wiring diagram 1999 model automatic
you need the Land Rover RAVE cd they have everything you need and more.
do a search online.
bd
hie need fuse underdriver wiring pinou
try searching for RAVE CD, this is the factory information all ona CD but can be run direct on your PC
[…] Simple hack for the P38 BECM serial communications […]